Difference between revisions of "Xsens"
(→Calibration) (Tag: Visual edit) |
|||
| (67 intermediate revisions by 2 users not shown) | |||
| Line 5: | Line 5: | ||
___TOC___ | ___TOC___ | ||
| − | [[Image: | + | [[Image:suit_and_case_small.png|thumb|200px|the case with all sensors and two suits|alt=]] |
= Case and Content = | = Case and Content = | ||
| − | The case contains everything you need to capture | + | The case contains everything you need to capture full body performances. The two suits in the small bags are for different body sizes. |
| − | |||
| − | == | + | == Sensors == |
| − | + | [[Image:collected_sensors.png|thumb|451x451px|''Top row, ltr:'' upper body sensors, lower body sensors, prop. ''Bottom row, ltr:'' upper body cable whip, lower body cable whip, cable whip to connect prop in conjunction with a body part. |alt=]] | |
| − | |||
| − | |||
| − | |||
| − | |||
| − | |||
| − | |||
| − | |||
| − | |||
| − | |||
| − | |||
| − | |||
| − | |||
| + | There should be 18 sensors in the case. | ||
| + | These 17 are essential to get the capturing process started at all: | ||
| + | Upper Body: 1 x Head, 1 x Stern, 3 x Left Shoulder, 1 x Left Hand, 3 x Right Shoulder, 1 x Right Hand | ||
| − | + | Lower Body: 1 x Pelvis, 3 x Right Leg, 3 x Left Leg | |
| − | + | Additional sensor: 1 x Prop. | |
| − | + | The Sensors are connected to cable whips that should be contained in the same bag as the sensors. | |
| − | == | + | === Sensor IDs === |
| + | Now and then a sensor might be malfunctioning. In that case you might want to swap them with the another sensor. This will lead the ID of the sensor to be representing a different body part than it was originally configured to be. It is very important though to inform us about the changes you've made to the sensor IDs role. | ||
| + | These are the sensor IDs and they're roles by default: | ||
| + | * "Pelvis" : "00B25BB7" | ||
| + | * "Sternum (T8)" : "00B23E19" | ||
| + | * "Head" : "00B23E27" | ||
| + | * "Right Shoulder" : "00B23E31" | ||
| + | * "Right Upper Arm" : "00B23E32" | ||
| + | * "Right Fore Arm" : "00B23E37" | ||
| + | * "Right Hand" : "00B23E28" | ||
| + | * "Left Shoulder" : "00B23E38" | ||
| + | * "Left Upper Arm" : "00B23E2B" | ||
| + | * "Left Fore Arm" : "00B23E2D" | ||
| + | * "Left Hand" : "00B23E36" | ||
| + | * "Right Upper Leg" : "00B2625E" | ||
| + | * "Right Lower Leg" : "00B2625D" | ||
| + | * "Right Foot" : "00B2623B" | ||
| + | * "Left Upper Leg" : "00B23E30" | ||
| + | * "Left Lower Leg" : "00B23E2C" | ||
| + | * "Left Foot" : "00B23E2E" | ||
| + | * "Prop" : "00B23E29" | ||
| − | |||
| + | {{Clear}} | ||
| + | |||
| + | == Bodypack == | ||
| + | [[File:Bodypack.png|alt=|right|frameless|161x161px]] | ||
| + | The bodypack is a small computer that processes the information provided by the sensors. | ||
| + | |||
| + | |||
| + | == Battery == | ||
| + | [[File:Battery.png|alt=|162x162px|Always charge.|right|frameless]] | ||
| + | The battery comes with a wrapper, a cable to connect it to the bodypack and a charger. | ||
| + | |||
| + | |||
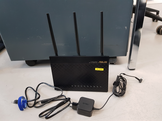
| + | == Router == | ||
| + | [[File:router.png|alt=|162x162px|Always charge.|right|frameless]] | ||
| + | The router is connected to a PC with an Ethernet Cable and sends the information it receives from the bodypack to the Xsens Mvn Software. | ||
| + | |||
| + | |||
| + | |||
| + | == Dongle == | ||
| + | [[File:dongelidong_marked.png|alt=|right|frameless|161x161px]] | ||
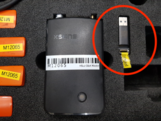
| + | The dongle is an authentification device that needs to be plugged into the PC to get the Xsens software running. You'll find the dongle right next to the bodypack. | ||
| + | |||
| + | |||
| + | == Additional Accessories == | ||
| + | There should be a tape measure as well inside of the case. | ||
| + | |||
| + | = Dressing up = | ||
| + | |||
| + | == Using the right dimensions == | ||
| + | |||
| + | [https://tutorial.xsens.com/video/putting-on-lycra-suit This is how you put on the lycra suit.] | ||
| + | |||
| + | So far we're offering two suits: L (1.60m - 1.75m) and XL (1.75m - 1.85m). You shouldn't put it on if you're larger than that. | ||
| + | |||
| + | == Washing the suit == | ||
| + | |||
| + | Due to hygienic reasons you must always wash the suit after using it. | ||
| + | Remove all cables, Bodypack and Motiontrackers. Follow the instructions on the label inside the suit: | ||
| + | *Only Synthetic machine wash at 30°C!!! | ||
| + | *Do not bleach | ||
| + | *Do not iron | ||
| + | *Do not dry clean | ||
| + | *Do not tumble dry | ||
| + | *For the headband, gloves and straps use only cold hand wash. | ||
| + | |||
| + | == Wiring things up == | ||
| + | |||
| + | {{EmbedVideo|service=youtube|id=laKbHOEJIoM}} | ||
| + | |||
| + | You can follow this instructional video to wire up the suit. | ||
| + | Always have a second person to help you set things up. | ||
= Xsens Mvn FullBody Software = | = Xsens Mvn FullBody Software = | ||
| − | + | There is a lot of information about the Software and how to use it on their [https://base.xsens.com/hc/en-us support page]. | |
| − | |||
== Installing the Software == | == Installing the Software == | ||
| − | Download the | + | Download MVN Analyze/Animate [https://www.xsens.com/software-downloads here]. |
| + | |||
| + | ==Motion Capture Live Streaming== | ||
| + | |||
| + | [[File:user_on.png|alt=|145x145px|thumb]]Connect the Router to your PC with an ethernet cable. | ||
| + | As soon as you're set up just activate the bodypack as depicted [https://youtu.be/laKbHOEJIoM?t=323 here]. | ||
| + | You should hear a double beep. | ||
| + | Go to "File", and press "Start Motion Capture". | ||
| + | |||
| + | Turn on a user. | ||
| + | All the working sensors should be depicted in green. | ||
| + | |||
| + | ===Body Dimensions=== | ||
| + | {{EmbedVideo|service=youtube|id=watch?v=naoKMO61TC4&list=PLvZN9PInPo3EEHGuTlvlt9VO3D-ZWzJiC&index=10}} | ||
| + | Insert the body dimensions of the user and save them for later re-use. | ||
| − | + | ===Calibration=== | |
| + | {{EmbedVideo|service=youtube|id=watch?v=vODt0MQhIxI&list=PLvZN9PInPo3EEHGuTlvlt9VO3D-ZWzJiC&index=8}} | ||
| + | Calibrate the body in order to have a proper looking performance. | ||
| − | + | ===Live Recording=== | |
| + | You should be able to start live recording now. | ||
| − | + | ===External Software Link=== | |
| + | Life Performances don't need to be limited to the Xsens Software. There are working realtime integrations with Maya, Motionbuilder, Unity and Unreal Engine. | ||
| − | == | + | ====Maya==== |
| + | Follow [https://www.xsens.com/software-downloads this link]. Under "Plugins, Integrations and Sychronizations" you can download the latest Maya Plugin. | ||
| + | Then just follow the procedure depicted in [https://tutorial.xsens.com/video/streaming-into-maya/?_ga=2.146072692.1980597521.1580895961-867382753.1579789401 this video] | ||
| + | ====Unreal Engine==== | ||
| + | There is a good documentation on how to set up the Xsens Suit with Unreal [https://www.xsens.com/integrations/unreal-engine here] | ||
| + | ====Unity Engine==== | ||
| + | There is a good documentation on how to set up the Xsens Suit with Unity [https://www.xsens.com/integrations/unity here]. | ||
| − | + | == OBR (On Body Recording) == | |
| + | OBR allows you to capture your movements anywhere. | ||
| − | + | ===Software Setup=== | |
| + | Go to OBR and turn it on. Configure if you're going to be moving on uneven ground. | ||
| − | + | ===Calibration=== | |
| + | There's a great description on how to calibrate OBR [https://base.xsens.com/hc/en-us/articles/360014728739-On-Body-Recording-OBR- here]. | ||
| − | + | ===Import=== | |
| + | There's a great description on how to import OBR [https://base.xsens.com/hc/en-us/articles/360014728739-On-Body-Recording-OBR- here] | ||
| + | =Troubleshooting= | ||
| − | = | + | ==Sensor not responding== |
| + | In this case a sensor might be broken. If it's a single sensor, like 'pelvis', 'stern', 'head', 'right hand', 'left hand' and also the 'right -' or 'left foot' you can try to swap it with the 'prop'. If it's sensor that doesn't allow a direct replacement, like a knee or an elbow, the suit is unusable and you have to contact us immediately. | ||
| − | == | + | ==Sensor ID Remapping== |
| + | Just drag the sensor you want to use into the sensor you want to have replaced. Please notify us about the changes you have made. | ||
| − | === | + | ==Live Link being blocked by OBR== |
| + | If your bodyback isn't being recognized for live streaming, it's probably caused by the OBR mode still being enabled in the bodypack. Connect the bodypack with USB to your computer. And then in the MVN Animate Software go to Preferences/Soft Acces Point -----> Disable OBR. | ||
| − | + | Now your bodypack should be recognizable for life streaming. | |
| − | == | + | ==Calibration not working== |
| + | In case the calibration is not working, there might be something wrong with a sensor in the suit. Another reason could be a bug inside of the software itself. Try to refresh your XSens Avatar. | ||
Latest revision as of 17:08, 1 October 2020
Motion Capturing with Xsens
_
_
Case and Content
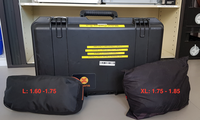
The case contains everything you need to capture full body performances. The two suits in the small bags are for different body sizes.
Sensors
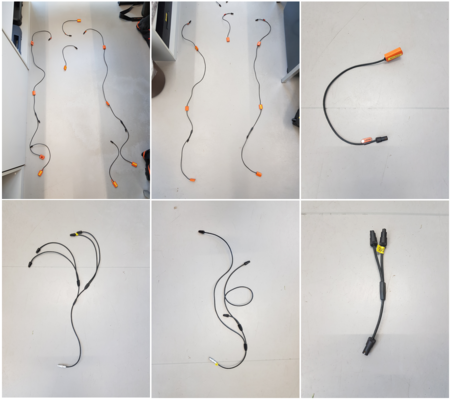
There should be 18 sensors in the case. These 17 are essential to get the capturing process started at all:
Upper Body: 1 x Head, 1 x Stern, 3 x Left Shoulder, 1 x Left Hand, 3 x Right Shoulder, 1 x Right Hand
Lower Body: 1 x Pelvis, 3 x Right Leg, 3 x Left Leg
Additional sensor: 1 x Prop.
The Sensors are connected to cable whips that should be contained in the same bag as the sensors.
Sensor IDs
Now and then a sensor might be malfunctioning. In that case you might want to swap them with the another sensor. This will lead the ID of the sensor to be representing a different body part than it was originally configured to be. It is very important though to inform us about the changes you've made to the sensor IDs role. These are the sensor IDs and they're roles by default:
- "Pelvis" : "00B25BB7"
- "Sternum (T8)" : "00B23E19"
- "Head" : "00B23E27"
- "Right Shoulder" : "00B23E31"
- "Right Upper Arm" : "00B23E32"
- "Right Fore Arm" : "00B23E37"
- "Right Hand" : "00B23E28"
- "Left Shoulder" : "00B23E38"
- "Left Upper Arm" : "00B23E2B"
- "Left Fore Arm" : "00B23E2D"
- "Left Hand" : "00B23E36"
- "Right Upper Leg" : "00B2625E"
- "Right Lower Leg" : "00B2625D"
- "Right Foot" : "00B2623B"
- "Left Upper Leg" : "00B23E30"
- "Left Lower Leg" : "00B23E2C"
- "Left Foot" : "00B23E2E"
- "Prop" : "00B23E29"
Bodypack
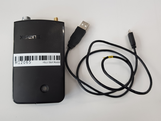
The bodypack is a small computer that processes the information provided by the sensors.
Battery
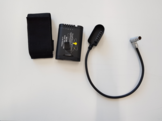
The battery comes with a wrapper, a cable to connect it to the bodypack and a charger.
Router
The router is connected to a PC with an Ethernet Cable and sends the information it receives from the bodypack to the Xsens Mvn Software.
Dongle
The dongle is an authentification device that needs to be plugged into the PC to get the Xsens software running. You'll find the dongle right next to the bodypack.
Additional Accessories
There should be a tape measure as well inside of the case.
Dressing up
Using the right dimensions
This is how you put on the lycra suit.
So far we're offering two suits: L (1.60m - 1.75m) and XL (1.75m - 1.85m). You shouldn't put it on if you're larger than that.
Washing the suit
Due to hygienic reasons you must always wash the suit after using it. Remove all cables, Bodypack and Motiontrackers. Follow the instructions on the label inside the suit:
- Only Synthetic machine wash at 30°C!!!
- Do not bleach
- Do not iron
- Do not dry clean
- Do not tumble dry
- For the headband, gloves and straps use only cold hand wash.
Wiring things up
You can follow this instructional video to wire up the suit. Always have a second person to help you set things up.
Xsens Mvn FullBody Software
There is a lot of information about the Software and how to use it on their support page.
Installing the Software
Download MVN Analyze/Animate here.
Motion Capture Live Streaming
Connect the Router to your PC with an ethernet cable.
As soon as you're set up just activate the bodypack as depicted here. You should hear a double beep. Go to "File", and press "Start Motion Capture".
Turn on a user. All the working sensors should be depicted in green.
Body Dimensions
Insert the body dimensions of the user and save them for later re-use.
Calibration
Calibrate the body in order to have a proper looking performance.
Live Recording
You should be able to start live recording now.
External Software Link
Life Performances don't need to be limited to the Xsens Software. There are working realtime integrations with Maya, Motionbuilder, Unity and Unreal Engine.
Maya
Follow this link. Under "Plugins, Integrations and Sychronizations" you can download the latest Maya Plugin. Then just follow the procedure depicted in this video
Unreal Engine
There is a good documentation on how to set up the Xsens Suit with Unreal here
Unity Engine
There is a good documentation on how to set up the Xsens Suit with Unity here.
OBR (On Body Recording)
OBR allows you to capture your movements anywhere.
Software Setup
Go to OBR and turn it on. Configure if you're going to be moving on uneven ground.
Calibration
There's a great description on how to calibrate OBR here.
Import
There's a great description on how to import OBR here
Troubleshooting
Sensor not responding
In this case a sensor might be broken. If it's a single sensor, like 'pelvis', 'stern', 'head', 'right hand', 'left hand' and also the 'right -' or 'left foot' you can try to swap it with the 'prop'. If it's sensor that doesn't allow a direct replacement, like a knee or an elbow, the suit is unusable and you have to contact us immediately.
Sensor ID Remapping
Just drag the sensor you want to use into the sensor you want to have replaced. Please notify us about the changes you have made.
Live Link being blocked by OBR
If your bodyback isn't being recognized for live streaming, it's probably caused by the OBR mode still being enabled in the bodypack. Connect the bodypack with USB to your computer. And then in the MVN Animate Software go to Preferences/Soft Acces Point -----> Disable OBR.
Now your bodypack should be recognizable for life streaming.
Calibration not working
In case the calibration is not working, there might be something wrong with a sensor in the suit. Another reason could be a bug inside of the software itself. Try to refresh your XSens Avatar.
