Difference between revisions of "Velo"
(filter section) (Tag: Visual edit) |
(minor edits) (Tag: Visual edit) |
||
| (2 intermediate revisions by the same user not shown) | |||
| Line 1: | Line 1: | ||
[[File:Icon.png|alt=|right|frameless]] | [[File:Icon.png|alt=|right|frameless]] | ||
| − | Velo is an App which helps you to keep your project organized. | + | [[Velo]] is an App which helps you to keep your project organized. |
The Main purpose is to take your animatic and create a folder structure from it. | The Main purpose is to take your animatic and create a folder structure from it. | ||
| − | [[File: | + | |
| − | [[File:Velo | + | [[File:Velo_screen.png|frameless|600x600px]] |
| + | |||
| + | To prepare your animatic you should open '''Davinci''' and create a new Timeline from your animatic. | ||
| + | |||
| + | Make sure that each shot is represented by one clip. The '''Detect Scene Cuts''' Feature might be helpful but double check your animatic. | ||
| + | |||
| + | With a '''Right Click > Clip Attributes... > Name''' you can name your Clips. This is useful to organize your project. In case you don't want to rename your clips you can use the '''auto rename''' function later. | ||
| + | |||
| + | [[File:Davinci name.png|frameless|600x600px]] | ||
| + | |||
| + | When you prepared your timeline you can export the edit via XML export. Right Click your Edit in the Media Pool. | ||
| + | |||
| + | '''timeline > Export > AAF / XML / EDL / DRT / OTIO...''' When you export the File make sure to export it as a '''Dolby Vision XML Files (*.xml)''' | ||
| + | |||
| + | [[File:Xml export.png|frameless|600x600px]] | ||
| + | |||
| + | You can export your animatic as an '''mp4''' to use it as a Referenz file. When have exported the XML File and your Reference Video you should prepare a '''Template Shot Folder'''. The Template Folder will be copied for all selected Shots. If you want to have a specific File Type in your Folder such as '''.blend''' or '''.ttvp''' you can simply add it to the template folder. | ||
| + | |||
| + | [[File:Template folder.png|frameless|600x600px]] | ||
| + | |||
| + | When you have the '''XML''', the '''Template Folder''' and the '''Reference Video''' ready you can launch the Velo App. | ||
| + | |||
| + | Fill out the form step by step. | ||
| + | |||
| + | [[File:Velo_filter.png|frameless|600x600px]] | ||
| + | |||
| + | '''select xml:''' select the xml file you just exported | ||
| + | |||
| + | '''select target folder:''' select the folder where you want to have all your shots | ||
| + | |||
| + | '''select template:''' select the template folder you prepared with your custom folders and work files (.blend, .tvpp, etc...) | ||
| + | |||
| + | '''select reference Video:''' select your animatic you just exported from Davinci | ||
| + | |||
| + | Select the shots you want to create or just hit the '''Select All Button'''. If you filled in the form correctly you should see all shots with the davinci naming in the table below. If you are unhappy with the naming you can check the '''auto rename''' Checkbox. In that case Velo will automatically name the shots. Starting with 010 and counting with a step size of 10 (010, 020, 030, ..... 990) so you have later the option to add shots in between. When you are all set you can press the '''Create Tasks''' Button. Velo will take a view seconds to process your shots. When you see the '''All Done!''' Message you can click '''OK.''' Velo will quit and open your selected '''target folder.''' | ||
| + | |||
| + | [[File:All Done!.png|frameless]] | ||
Latest revision as of 13:53, 18 June 2024
Velo is an App which helps you to keep your project organized.
The Main purpose is to take your animatic and create a folder structure from it.
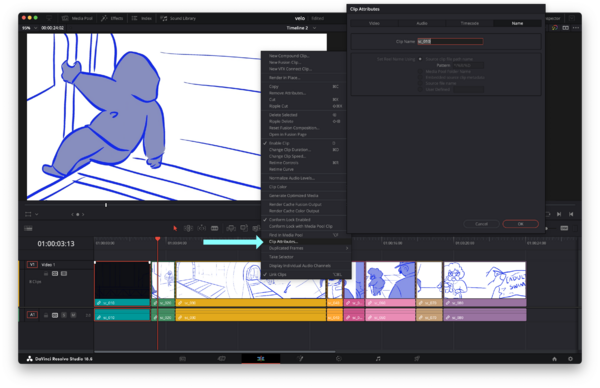
To prepare your animatic you should open Davinci and create a new Timeline from your animatic.
Make sure that each shot is represented by one clip. The Detect Scene Cuts Feature might be helpful but double check your animatic.
With a Right Click > Clip Attributes... > Name you can name your Clips. This is useful to organize your project. In case you don't want to rename your clips you can use the auto rename function later.
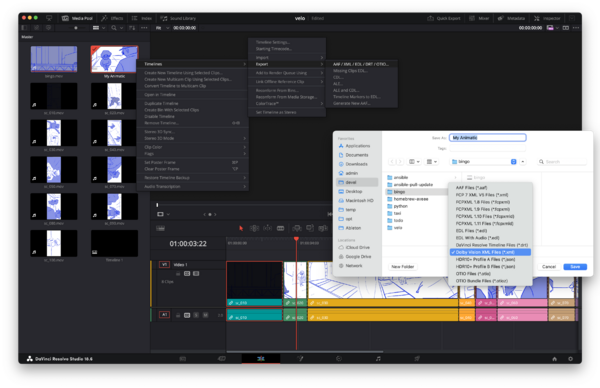
When you prepared your timeline you can export the edit via XML export. Right Click your Edit in the Media Pool.
timeline > Export > AAF / XML / EDL / DRT / OTIO... When you export the File make sure to export it as a Dolby Vision XML Files (*.xml)
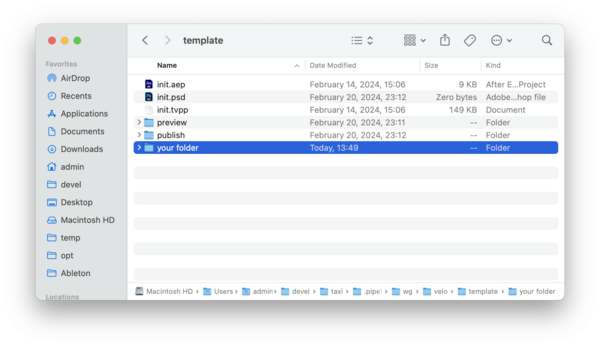
You can export your animatic as an mp4 to use it as a Referenz file. When have exported the XML File and your Reference Video you should prepare a Template Shot Folder. The Template Folder will be copied for all selected Shots. If you want to have a specific File Type in your Folder such as .blend or .ttvp you can simply add it to the template folder.
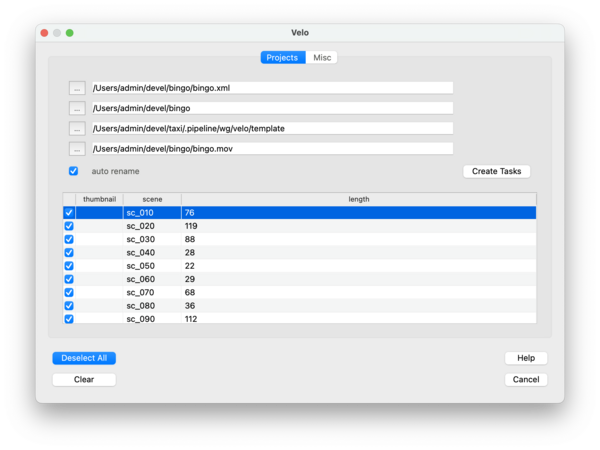
When you have the XML, the Template Folder and the Reference Video ready you can launch the Velo App.
Fill out the form step by step.
select xml: select the xml file you just exported
select target folder: select the folder where you want to have all your shots
select template: select the template folder you prepared with your custom folders and work files (.blend, .tvpp, etc...)
select reference Video: select your animatic you just exported from Davinci
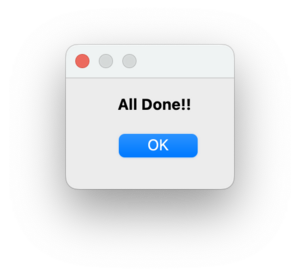
Select the shots you want to create or just hit the Select All Button. If you filled in the form correctly you should see all shots with the davinci naming in the table below. If you are unhappy with the naming you can check the auto rename Checkbox. In that case Velo will automatically name the shots. Starting with 010 and counting with a step size of 10 (010, 020, 030, ..... 990) so you have later the option to add shots in between. When you are all set you can press the Create Tasks Button. Velo will take a view seconds to process your shots. When you see the All Done! Message you can click OK. Velo will quit and open your selected target folder.
